> ## Documentation Index
> Fetch the complete documentation index at: https://bunnynet-cb9733c2-burrow-origin-shield.mintlify.site/llms.txt
> Use this file to discover all available pages before exploring further.
# Enable Bunny DNS and CDN Acceleration
> Migrate your domain to Bunny DNS and enable CDN Acceleration. This is a prerequisite for the Bunny Offloader and Bunny Shield features in the WordPress plugin.
Several features of the bunny.net WordPress plugin, including **Bunny Offloader** and **Bunny Shield**, require that your domain uses Bunny DNS with CDN Acceleration enabled. Traffic must flow through the bunny.net CDN proxy so the plugin can offload media to Storage and so Shield can inspect and mitigate requests at the edge.
This guide walks through migrating your domain to Bunny DNS, enabling CDN Acceleration, and verifying that everything is wired up correctly. Once complete, head to [Enable Offloader](/integrations/wordpress/offloader) or [Enable Shield](/integrations/wordpress/shield) to turn on the features themselves.
These features are only supported when using the official bunny.net plugin and
managing DNS through bunny.net. They are not compatible with third-party
plugins or external DNS providers.
## Prerequisites
* A [bunny.net account](https://dash.bunny.net)
* Access to manage your domain's DNS settings
## Step 1: Migrate your domain to Bunny DNS
Skip this step if your domain is already using Bunny DNS.
Log in to bunny.net and go to **Delivery → DNS → Add DNS Zone**. Enter your
domain name and click **Add DNS Zone**.
Follow the setup instructions, then click **Okay, I'm done**. Click **Add
Record**, enter the required details, and continue adding records as needed.
Confirm your DNS settings have propagated using the [bunny DNS Lookup
Tool](https://tools.bunny.net/dns-lookup). Look for NS records pointing to
`kiki.bunny.net` or `coco.bunny.net`.
When creating a DNS zone, it must be based on the root domain (e.g.,
`domain.com`). Creating a zone for `www.domain.com` or `something.domain.com`
is not valid.
When migrating your DNS, make sure to transfer **all** existing DNS records,
not just the website-related ones. Failing to do so can result in critical
services (like email) going offline.
## Step 2: Enable CDN Acceleration in the plugin
If your domain was already using Bunny DNS when you installed the plugin, the
"Enable CDN Acceleration" option may not appear. Skip to Step 3 to check if
it's already enabled. If not, you can reset the plugin to start the
configuration from scratch.
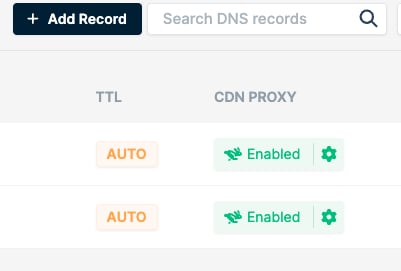
In the bunny.net dashboard, go to the **DNS** section. Click the button in the **CDN Proxy** (or CDN acceleration) column next to each DNS record.
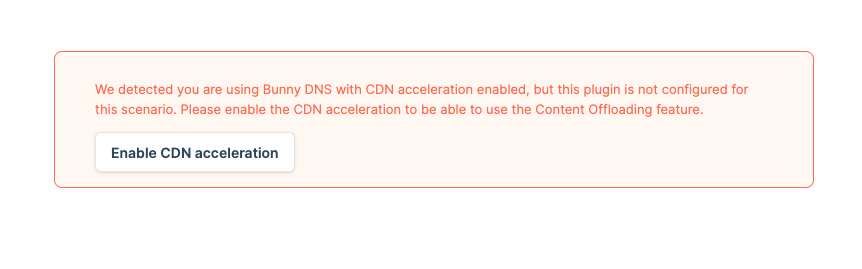
 In your WordPress Admin Panel, navigate to **bunny.net → Offloader** or **bunny.net → Shield**. Follow the on-screen prompts and click **Enable CDN Acceleration** (or **Enable Bunny DNS** from the Shield tab). You'll receive an orange confirmation message once configured.
 Enabling CDN acceleration disconnects your current Pull Zone and creates a new
one. Make sure to copy any essential settings (Edge Rules, Cache settings,
Optimizer configurations) from the old zone to the new one. The old Pull Zone
can be safely deleted after migration.
## Step 3: Confirm CDN Acceleration is working
Verify your setup using any of these methods:
* In the bunny.net **DNS** section, a green **CDN Proxy** icon next to your DNS record indicates proper CDN integration.
Enabling CDN acceleration disconnects your current Pull Zone and creates a new
one. Make sure to copy any essential settings (Edge Rules, Cache settings,
Optimizer configurations) from the old zone to the new one. The old Pull Zone
can be safely deleted after migration.
## Step 3: Confirm CDN Acceleration is working
Verify your setup using any of these methods:
* In the bunny.net **DNS** section, a green **CDN Proxy** icon next to your DNS record indicates proper CDN integration.
 * Inspect response headers from your site. Look for:
* `CDN-ProxyVer: 1.04`
* `CDN-RequestPullSuccess: True`
* `CDN-RequestPullCode: 200`
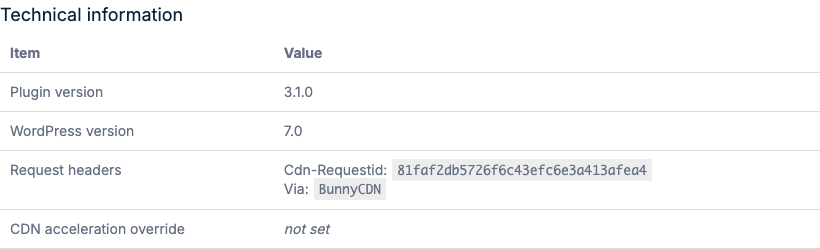
* In your WordPress Admin Panel, go to **bunny.net → About**. Under **Technical Information**, check the **Request Headers** section. If you see both `Cdn-RequestId` and `Via: BunnyCDN`, everything is working.
* Inspect response headers from your site. Look for:
* `CDN-ProxyVer: 1.04`
* `CDN-RequestPullSuccess: True`
* `CDN-RequestPullCode: 200`
* In your WordPress Admin Panel, go to **bunny.net → About**. Under **Technical Information**, check the **Request Headers** section. If you see both `Cdn-RequestId` and `Via: BunnyCDN`, everything is working.
 ## Next steps
Offload media files to Bunny Storage for scalable, globally replicated
delivery.
Turn on WAF and DDoS protection with Bunny Shield.
## Next steps
Offload media files to Bunny Storage for scalable, globally replicated
delivery.
Turn on WAF and DDoS protection with Bunny Shield.